-
Adafruit IoT Monthly: Wearables for Kids, The Humane AI Pin, and more!
IoT Projects
Wearables for Diabetes Monitoring

Andrew Childs designed and built a wearable for his 9 y.o. son. His son has Type 1 diabetes and an off-the-shelf monitoring system like the Apple Watch provides too many distractions for a kid - it’s just too complex. So, he built his own! The blog post details the entire build process, from requirements to prototypes to custom glass fabrication. - andrewchilds.com
Espresso Machine Water Tank Monitor
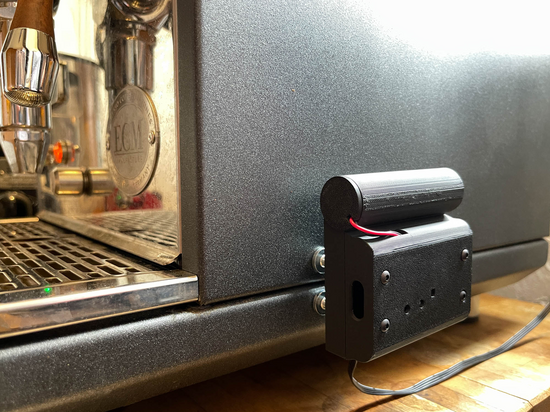
John Park’s espresso machine has a “water reservoir that’s inconvenient to check on”. To solve this, he built a “contactless remote water level meter that harnesses the power of “The INTERNET” to keep us informed without having to move all the cups, lift the lid, and peer into it like some kind of luddite!” - Adafruit Learning System
Low Power Rain Gauge
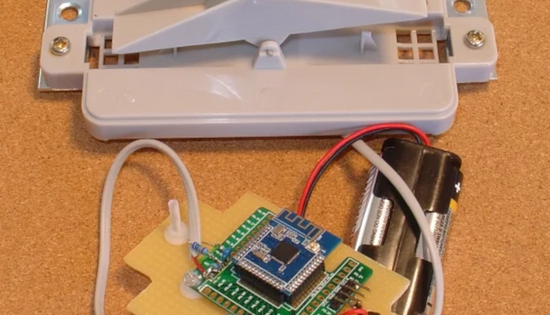
A pair of AA batteries power this low-power rain gauge. The circuitry is relatively simple, using an nRF52832 module and the Bluetooth Low Energy protocol to send rainfall data to an Android application. -HackADay
Train Tracker, Tide Tracker, and Much More!

Brian Benchoff wanted “a device that will ping the city’s API for all the bus stops near my house, and condense that into a list I can put on a small display somewhere”. The result is a small e-ink display that not only shows the next bus arrival times but also the current tide schedule, and the current weather. Like the smartwatch above, this is another really great build guide. It goes into depth, detailing the difficulties of scraping a city’s bus schedule API and digesting it with a microcontroller. - bbenchoff
IoT News and More!
Humane’s AI Pin

The main story in February was the demise of Humane’s AI pin. This has been a poor rollout for one of the first consumer-focused AIoT hardware. After a large number of bad reviews spelled danger for the AI Pin - reports of units being returned more than they are sold and battery fire concerns made headlines. This all culminated in HP acquiring Humane in February for $116 million. As part of the acquisition, AI Pins stopped functioning at February 28, 2025. If you own one of these $699 devices, there is still hope! A recent WIRED article details a group working to keep the devices online.
-
Adafruit IoT Monthly: Bicycle Web Server, The 6GHz Frequency Band, and more!
IoT Projects
Holiday IoT Switch

Even though we are past the holidays, you can build this project for next year! This switch uses a massive 10mm diameter arcade button to wirelessly send a message to a smart outlet to turn on the holiday lighting. -Adafruit Learning System
Bike Web Server
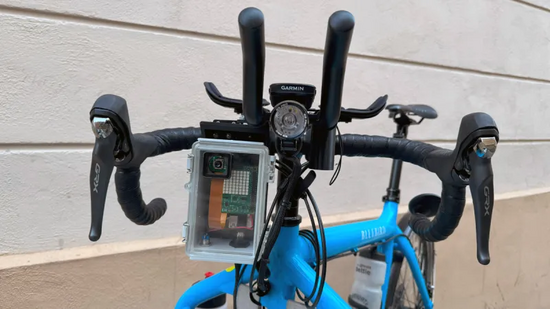
Jelle Reith’s bike doubles as a mobile web server. -HackADay
Distance Running Training with an IoT Pet Feeder

Dan purchased an IoT pet feeder, filled it with their favorite candy, and had it dispense a piece of candy if they ran far enough. It ended up being an effective training program, they recently completed a half marathon. -mayer.cool
IoT News and More!
Adafruit IO in 2025 – We Want Your Feedback!
The developers and designers on the Adafruit IO team are requesting feedback (from you!) to help guide our development of Adafruit IO in 2025. If you’re a current Adafruit Free IO user, an Adafruit IO Plus (paid) user, or have previously used Adafruit IO in the last year, we want to hear from you! - Adafruit Blog
u-blox Phases Out its Cellular IoT Modules
u-blox, a provider of connectivity modules, announced that is phasing out its cellular business in 2025. They are re-focusing on short-range radio modules such as WiFi and Bluetooth. - ublox
Matter will be better in 2025 — say the people who make it

An interview with the Connectivity Standards Alliance about current concerns and the future of the Matter protocol in 2025. - The Verge
6GHz Frequency Band Opens in the US

The FCC announced the 6GHz band would be opened to “very low power devices”. As to what qualifies as a low-power device - we’re not sure yet. - HackaDay
-
Adafruit IoT Monthly: The 2024 Recap Issue!
Editor’s Note - Happy Holidays!

Hello readers,
I’m Brent. I’m an engineer! I work for Adafruit on all kinds of things, including writing the newsletter you are currently reading. The IOT Monthly is a newsletter different from what you may be used to reading. This newsletter is distributed only once per month, giving us enough time to gather information from around the internet for you. This isn’t an industry newsletter, nor a newsletter covering every IoT project or news item. Instead, it’s a carefully curated collection of projects and news that we find genuinely interesting.
As a tradition, I typically start the new year with a newsletter that recaps our favorite things from the previous year. This lets me reflect on the past year and share with you some of the interesting projects and news that I’ve come across. I’d also like to extend a “hug report” (Adafruit’s parlance for “thank you”) to our copyeditor, Anne, for her behind-the-scenes editing work on these newsletters for the past 4 years.
If you have feedback for improving this newsletter, please let me know. I’m always looking for ways to make it better. Also, if you want to submit your project directly to this newsletter, please email us at iotnews @ adafruit.com (remove the spaces!).
I hope you had a wonderful and restful holiday season,
Brent
2024 IoT Projects, in Recap
IKEA Vindriktning Air Quality Sensor Hacks

The IKEA Vindriktning is an inexpensive air-quality monitor that’s readily available online (from Ikea’s website) or at a retail IKEA store. We published two guides on hacking these devices to add additional sensors and connect them to the internet for logging measurements. – Adafruit Learning System
Industrial Network Playground
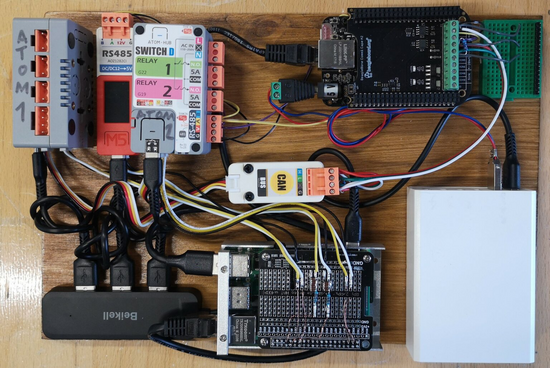
This is a smorgasbord of industrial network components, including PLCs, connected to a network. The playground helps a beginner learn and experiment with industrial control systems, without physically being in a factory. - HackADay.io
Adorable CO2 Gauge
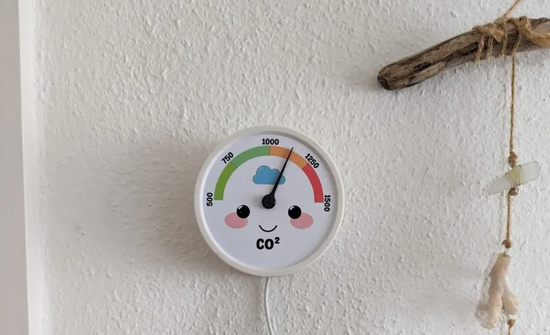
An adorable internet-connected sensor that is unobtrusive and passively displays CO2 information. I really like these gauges and would like to see more thought put into projects like this! While internet-connected, the gauge does not require a mobile website or app. The information it presents can be interpreted by a child. But they also log data to the Internet for observing long-term trends and alerting. - kuenzi.dev
AI Image Description Camera

2024 was a year filled to the brim with AI announcements. This is a great project from Adafruit’s Liz Clark to illustrate the capabilities of OpenAI’s image description model. Images taken with the Adafruit MEMENTO camera are sent to OpenAI “to request a description of the image with various prompts”. The OpenAI response is visible on the camera’s display. – [Adafruit Learning System]((https://learn.adafruit.com/openai-image-descriptors-with-memento)
News, in Recap
I’ve enjoyed reading and learning about the following news articles in 2024…
-
The Open Home Foundation, comprised of popular open-source projects like Home Assistant, ESPHome, Zigpy, Piper, Improv Wi-Fi, and Wyoming, was founded to work against “surveillance capitalism, the risk of a buyout, and open-source projects becoming abandonware”. - Open Home Foundation
-
Tennessee Tech developed a way to power sensors in a field by transmitting electric power through the soil. – IEEE Spectrum
-
A solar storm in May 2024 had impacts that were felt by millions of IoT devices. Memfault dives into their databases to find out how many of their monitored devices were impacted. – Memfault Blog
-
Consumer Report’s Stacey Higginbotham wrote about why manufacturers should embrace vulnerability disclosure programs for IoT devices. – Consumer Reports
-
WiLo is a new hybrid protocol that combines WiFi and LoRa. The result is a new approach for sending data (larger packet sizes than LoRa) over long distances, perfect for industrial IoT or agriculture IoT applications. – [IEEE Spectrum]
-
-
Adafruit IoT Monthly: Halloween, WiLo, and more!
IoT Projects
IoT Fog Machine with Motion Sensor

Step up your fall decor game this year with a motion-sensitive fog machine. This guide will show you how to hack a standard-issue Halloween-store fog machine to add lights and reactivity, and control your lights and fog from your smartphone – from anywhere in the world! - Adafruit Learning System
An Internet-Connected TI-84 with ChatGPT
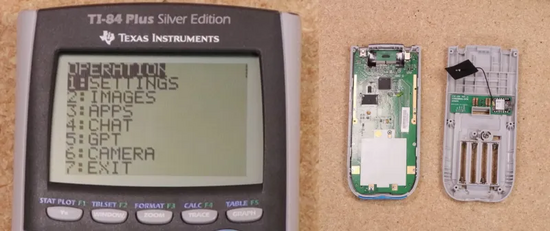
Remember using TI-BASIC to create programs to calculate the side of a triangle, instead of memorizing the Pythagorean theorem? Well, it’s 2024 and this TI-84 has been modified to connect to the internet. It can connect to OpenAI’s ChatGPT client and can be used to chat with the AI. - HackADay
Use Apple HomeKit Devices with itsaSNAP and Adafruit IO
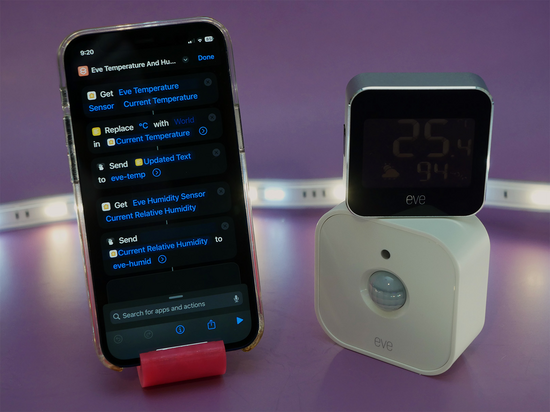
Have you ever looked at your various Apple HomeKit devices and thought “If only I could monitor and control my devices in Adafruit IO”? Now you can with the help of the itsaSNAP app. You can use Apple Shortcuts with itsaSNAP to integrate your Apple HomeKit devices with Adafruit IO. You can go even further and use CircuitPython to display and log your device’s data using Adafruit IO feeds.- Adafruit Learning System
An Interactive and Free Bluetooth GATT Course on YouTube
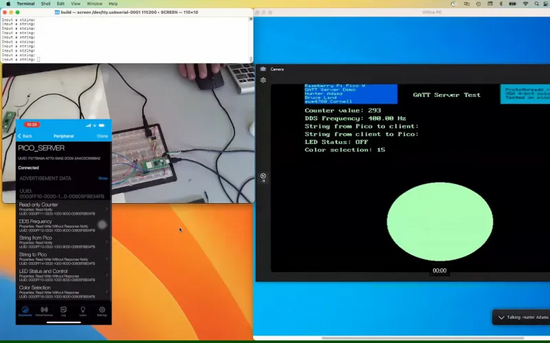
HackADay blogged about this excellent Bluetooth GATT (Generic Attribute) series on Cornell Professor V. Hunter Adams’ YouTube channel. You’ll learn about the protocol, set up a Bluetooth GATT server on a Raspberry Pi Pico W, and use a smartphone app to send data to the server. - HackADay
IoT News and More!
Cisco Is Abandoning the LoRaWAN Space With No Lifeboat For IoT Customers

Cisco announced it’s abandoning the Cisco LoRaWAN product lines in 2025 and the LoRaWAN space. Further, Cisco has announced that they are not providing migration plans. Companies who relied on Cisco’s reputation in the networking space to build their solutions are now left to find a new LoRaWAN network and hardware provider. - The Register
New Protocol: WiLo - WiFi Meets LoRa
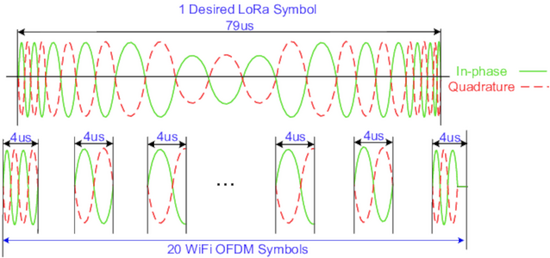
WiLo is a new hybrid protocol that combines WiFi and LoRa. The result is a new approach for sending data (larger packet sizes than LoRa) over long distances, perfect for industrial IoT or agriculture IoT applications. - IEEE Spectrum
Aerogarden Shuts Down Its Servers
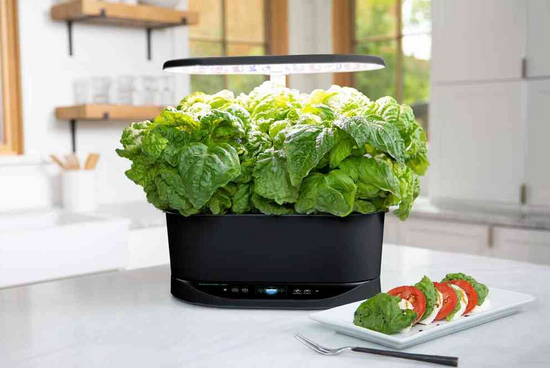
AeroGarden, which produces the “Smart Planters” sold by Scotts Miracle-Gro, is going out of business. The future of these desktop smart gardens is now uncertain, as they require a mobile app and a server to function. - ArsTechnica
IKEA Rolls Out Matter Support

Matter is the smart home industry’s new standard that allows smart products to connect and work together seamlessly, no matter which brand they’re from. IKEA is rolling out Matter support in their smart home hub, the DIRIGERA. The new firmware turns it into a “Matter Bridge” and is already available for download. - IKEA
Public WiFi in London Gets Hacked

Adafruit is located in New York City where there is now public WiFi in the subway stations. The same is true across the pond in London, except their public WiFi was recently hacked. The hacker was able to change the login message to a message about terror attacks. An internal investigation found that the hack came from “inside”, a breached admin account. This is a good reminder to consider what data you send when connected to a public WiFi network. - BBC
-
Adafruit IoT Monthly: Garden Lights, Bluetooth 6.0, and more!
Rescheduled - Adafruit IOT Day
In the 09/01/24 edition of Adafruit IoT Monthly, we announced the first annual “Adafruit IO Day” on 10/10/24. To give us more time for preparation and planning (and to have a fun event to kick off the New Year), “Adafruit IoT Day” is rescheduled from 10/10/24 to 01/10/25.
Stay tuned for more information on how you can participate in Adafruit IoT Day!
IoT Projects
Garden Path Lights with Sunset Detection

These modular, weather-resistant pathway lights are anything but ordinary. The pathway lights are fully controllable using the free, open-source WLED software, so you can create dazzling light shows right in your backyard. - Adafruit Learning System
Convert an Antique Sump Motor Pump to a Smart WiFi-Controlled Gadget
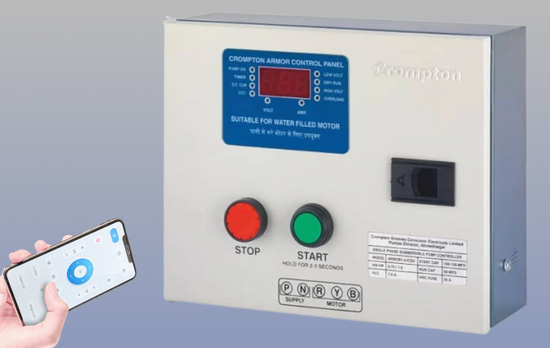
If you have a sump pump at home, you know how much of a hassle it can be to start and stop it. This project converts an antiquated DOL (Direct On-Line) pump starter into a smart device that you can control from your smartphone - Adafruit Blog
Daily Weather Forecast Board

Build a small weather forecast board that shows the current temperature and weather conditions. The project uses Adafruit IO to store weather data, the itsaSNAP App to send weather data to Adafruit IO, and Apple Shortcuts to automate itsaSNAP functions - Adafruit Learning System
“Rooting” an Inexpensive AliExpress WiFi Repeater

Easton found WiFi repeaters during a trip to Aliexpress’ website and got access to its console. This exploit he discovers turns the WiFi repeater into an inexpensive Linux appliance with WiFi. - HackADay
$1697 for an Air Conditioner On/Off switch
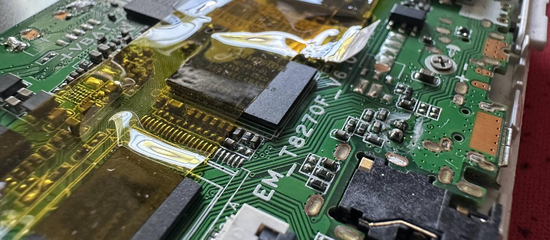
Hopefully Useful’s house uses a HVAC system that includes a Advantage Air e-zone system. When the system’s tablet became “outdated”, they were quoted $1,697 for a newer tablet to be used as an on/off switch. Instead of paying the $1,697, they decided to modify the system to work with an older tablet. Hopefully this post is useful to someone else in the same situation! - hopefullyuseful
IoT News and More!
Robot round up – yard helping robots and a few others

One of Adafruit’s bloggers “was doing research for one type of outside robot and ended up looking a bunch more”. The breadth of robots they found range from lawn-mowing smart robots to robots that weed your vegtable garden. - Adafruit Blog
Low Cost CO2 Sensors Comparison: Photo-Acoustic vs NDIR
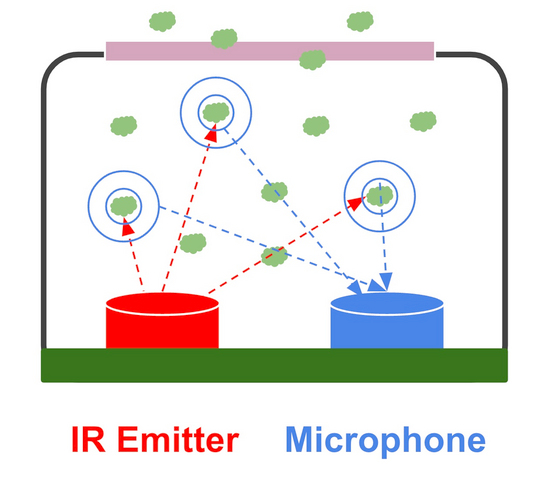
There are three ways for your IoT project to measure CO2. AirGradient’s blog post explains each type of CO2 sensor and performs a quantatative analysis between different low-cost CO2 sensors - Adafruit Blog
Bluetooth 6.0 Specification Released
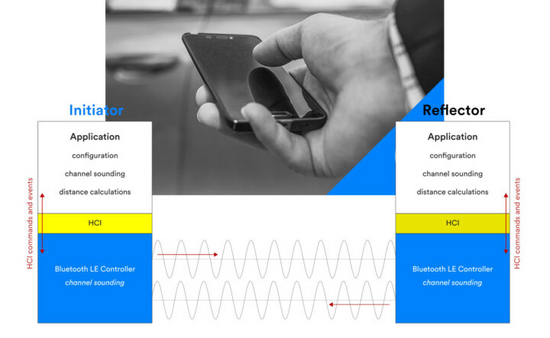
The Bluetooth 6.0 specification will bring noticable improvements to the Bluetooth standard. In the list of the new improvements, an exciting new feature is “Bluetooth Channel Sounding”. If you’ve used Apple’s “Find My” feature to locate your AirPod Pro case, you’ve used Bluetooth Channel Sounding. The improvement in the Bluetooth 6.0 specification changes how the two BLE devices calculate the distance between them, moving from a legacy method based on the Bluetooth signal’s strength to Phased-Based Ranging (PBR) for precise distance measurements. - CNX-Software
What Chip Designers Can Do to Accelerate AI Adoption

Henrik Flodell argues that “device designers’ hesitancy about embedding ML algorithms has slowed the momentum behind ML in IoT and other types of device that are normally based on an MCU.” He writes about the “3 Features of an ML-Friendly” Microcontroller and to give Microcontroller manufacturers a starting point to adopt ML algorithms into their chips. - Embedded Computing
