-
Adafruit IoT Monthly: Adafruit IO Updates, RGB Stream Deck Message Panel, and more
Adafruit IOT Updates
Adafruit IO Update: New User Interface!
 We’ve updated the Adafruit IO user interface to match recent changes on the Adafruit website and the Adafruit Learning System. Here’s a shortlist of changes:
- New User Interface!
- Reorganized menus
- Quick links to access your data faster
- New footer - the footer from adafruit.com was moved over. The new footer includes links to API documentation, forums, and the support page.
This is a pretty big update to the IO user interface, one that we hope makes it quicker to get around and easier to find what you’re looking for. Please stop by our channel on the Adafruit Discord server and reach out if you have any questions!
Read the full changelog with screenshots!.
New IoT LoRaWAN Hardware: The Things Indoor Gateway!
 Meet the affordable 8 Channel LoRa gateway from TTN, The Things Indoor Gateway! Simple name for a straight-to-the point product. It’s the new low cost, indoor multi-channel LoRaWAN gateway designed by The Things Network, so you know it will work perfectly with TTN. Make a free account, plug it in, follow the easy step-by-step installation instructions and you’ve got yourself a LoRaWAN to Internet gateway in under 5 minutes. No setup or usage fees.
Visit the product page to learn more.
New IoT Hardware: M5Stick-C Pico
 Jam-packed with a Wi-Fi & Bluetooth powered ESP32, USB interface, Li-Poly battery and charge circuitry, 0.96” color TFT display, various sensors (IR transmitter, microphone, 6-DoF IMU sensor) all integrated inside, buttons, and more! You can plug Grove sensors into one end, or use the 0.1” header sockets on the other, to connect additional sensors or actuators. It’s perfect for making ultra-small IoT projects or wearables.
Visit the product page to learn more…
IoT Projects
Stream Deck controlled RGB Message Panel using Adafruit IO

Easily display status messages with a Stream Deck and an RGB Matrix Panel.
This project uses a custom Stream Deck plugin to communicate directly with the Adafruit IO REST API. It works by posting a specific value to a feed and each button will post a different value to the feed allowing you to easily change messages.
Read the guide on the Adafruit Learning System here.
PyPortal Daily UV Index Display
 UV is what gives you vitamin D and a tan… and a sunburn… and, well, skin cancer. It’s a case of a little being ok but too much being pretty bad. Like bacon. You can now check the UV index at a glance on your PyPortal.
Read the guide on the Adafruit Learning System here.
PyPortal IoT Plant Monitor with Google Cloud IoT Core and CircuitPython
 Turn your black thumb into a green thumb by building an internet-enabled plant monitoring system by combining Google Cloud IoT Core with CircuitPython.
Read the guide on the Adafruit Learning System here.
Consumers Should Immediately - a live feed of recalled product info on a boot
 Named “Consumers Should Immediately…“, it displays a live data feed from The United States Consumer Product Safety Commission (USCPSC) to randomly display thousands of products recalled for reasons such as fire, electrocution, entrapment, choking and a variety of other unintended dangers. - ExtraSleepy.com.
3D Printed LoRA Remote

Via back7.co:
This is meant to be a simple remote control for LoRa-based robotics projects. It runs CircuitPython
Live Train Station Departure Sign for your Desk
 Build your own UK train station platform departure display (next train indicator) with live data using a Raspberry Pi Zero, OLED display and 3D printed case - a cool (and practical!) desktop gadget - balena.io
Around the Internet - IoT News & Links
 Ludzinc has been building a IoT Garage Door Opener since 2013, and blogged about Easier ESP development (learn from their four years of frustration). It’s an incredibly comprehensive post discussing everything from websockets to selecting proper hardware.
The OpenHAK is an open-source fitness tracker which can count your steps and measure your heart rate. Step counting is done by a Bosch BMI160, and the heart rate sensing is done with a Maxim MAX30101. The whole thing is driven and built around a Simblee BLE radio module.

Officially build an Alexa Gadget with your Raspberry Pi to control a RGB LED - Alexa on GitHub
 Pwavrobot is building a dual esp32 feather-format board, just for fun.
Icarus, a new IoT Board with the latest nRF91 integrates GPS and Cellular (LTE-M, MB-IoT) - Actinius

The Next Wave of IoT Bluetooth devices might not have batteries thanks to Bluetooth 5 and Energy Harvesting - EETimes
What is Adafruit IO?
Adafruit.io has over 14,000+ active users in the last 30 days and over 830+ Adafruit IO Plus subscribers. Sign up for Adafruit IO (for free!) by clicking this link.
Ready to upgrade? Click here to read more about Adafruit IO+, our subscription-based service. We don’t have investors and we’re not going to sell your data. When you sign up for Adafruit IO+, you’re supporting the same Adafruit Industries whose hardware and software you already know and love. You help make sure we’re not going anywhere by letting us know we’re on the right track.
-
Adafruit IO Update: New User Interface! @adafruitio #IoT
We have updated the Adafruit IO user interface to take advantage of recent changes to https://www.adafruit.com and https://learn.adafruit.com along with a batch of internal changes that improve the size of initial code downloaded when you visit the site–total script size was reduced by about 15%–and speed up the initial page load when you visit a page on https://io.adafruit.com.
The biggest change you’ll notice is a reorganization of our menus. The old menu from the left hand side of the screen is now split between a new header (top of page) with Adafruit-styled “flyout” menus linking to your pages within the site and a footer (bottom of page) with links to information about Adafruit IO.
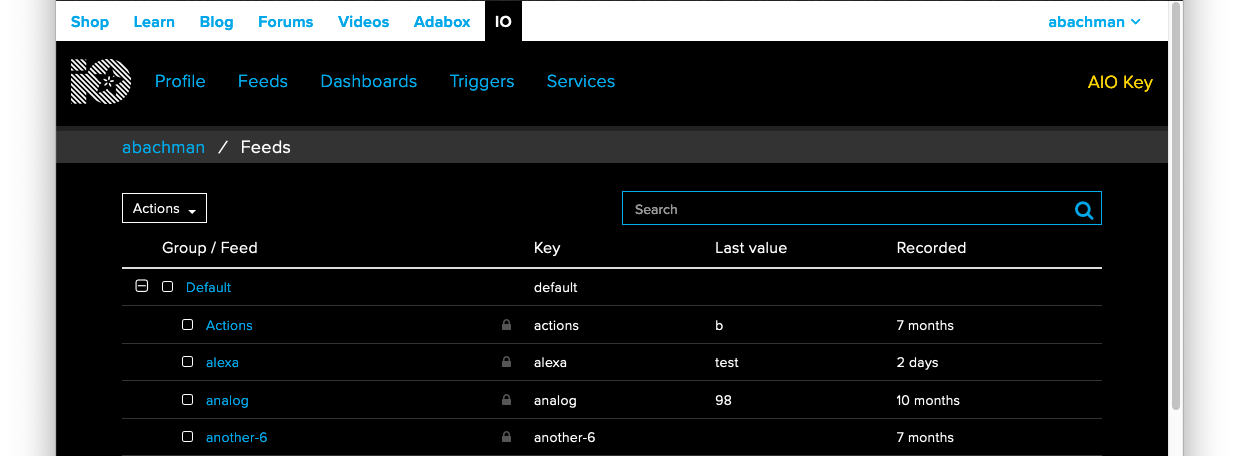
The header includes links to other Adafruit sites and to other pages in io.adafruit.com.
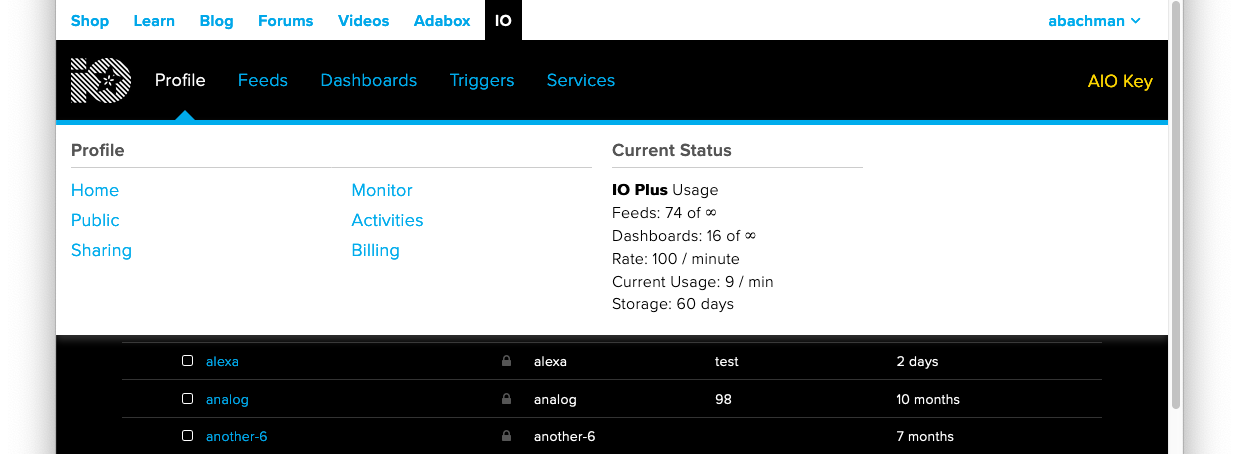
Click on a menu heading, like “Profile”, to show links to the rest of your data on Adafruit IO.
Quick links to your data
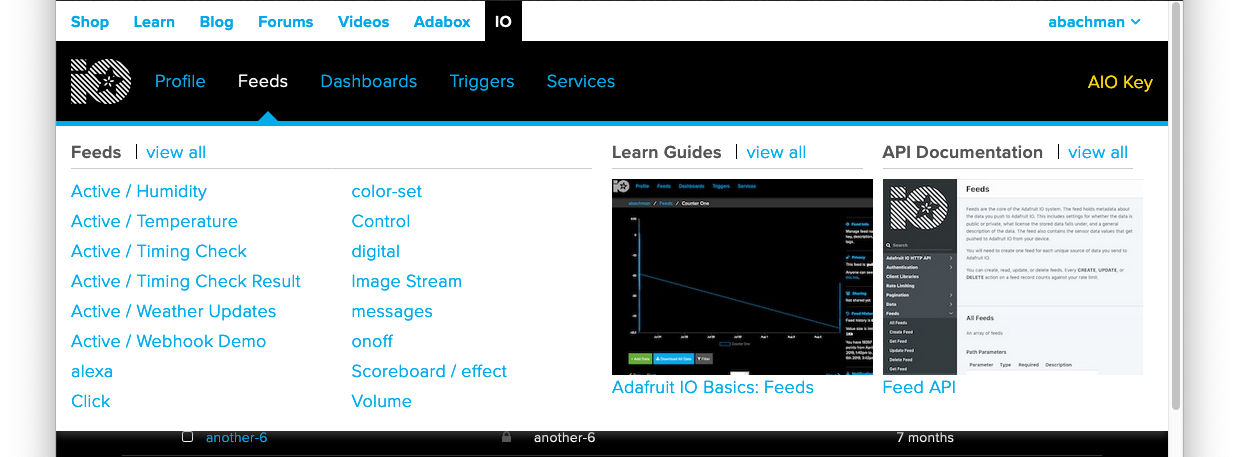
The new Feeds, Dashboards, and Triggers menus also include quick links to your most recently updated feeds, dashboards, and triggers.
Footer quotes!
Finally, we’ve brought the footer from Adafruit over. It sits at the bottom of every page and is where you can find links to our support page, quick guides, API documentation, and the feedback form.

This is a pretty big update to the IO user interface, one that we hope makes it quicker to get around and easier to find what you’re looking for. Please stop by the forums or our channel on the Adafruit Discord server and reach out if you have any questions!
-
Adafruit IOT Monthly: MQTT Comes to CircuitPython, an Interactive IoT Airplane Sculpture and more!
Adafruit IOT Updates
MQTT comes to CircuitPython!

So, you have a CircuitPython project and want to connect it to the internet? You may want to consider adding MQTT to your project. MQTT is an extremely popular and lightweight protocol which can connect your project to the internet and quickly process network events. We’ve built a robust MQTT module for CircuitPython called CircuitPython MiniMQTT to quickly get you started connecting your projects to the internet and sending data around. Learn all about using MQTT with CircuitPython in on the Adafruit Learning System Guide here!
Adafruit IO CircuitPython Library UPDATE: MQTT!
 The Adafruit IO CircuitPython library has been updated with a new IO_MQTT class for accessing Adafruit IO’s MQTT Broker. We’ve included helpful methods for simplifying interactions with Adafruit IO over MQTT. Download the latest version of the Adafruit IO CircuitPython Library in the CircuitPython Bundle here and check out some examples which make use of the new MQTT class here.
New IoT Hardware: 8-Channel LoRa Gateway HAT with LoRa and GPS Antenna
 This LoRa HAT from RAK Wireless is capable of multi-channel, multi-node communication, all running in a non-intimidating, hackable Raspberry Pi environment. Unlike our basic LoRa gateway bonnet, this chipset can support all 8 channels, so it can handle multiple clients, on different LoRa channels, without having to do any code tweaks. Visit the product page fo the LoRa Gateway HAT here! Once you have your Internet-to-LoRa gateway set up with this kit, make LoRa nodes using our Feather line for easy deployment of sensor networks that run on battery power. We have guides about setting up LoRaWAN nodes using either Arduino OR CircuitPython on the Adafruit Learning System here.
#ComingSoon IoT Hardware: Circuit Playground Express BlueFruit

We are testing the Circuit Playground Express BlueFruit, check out the coming soon photos. We went to Washington Square Park at night to test how far we could change the colors of the NeoPixels on the CPX Bluefruit and we’re going to need a bigger park to test in maybe 🙂
Watch us test the CPX BlueFruit here!!
IoT Projects
Interactive Airplane Sculpture, beautiful and internet connected
 “The Imagination Machine” has been my main focus for a little over 9 months. I’m thrilled to see it in such a grand space. As you may read in the articles, it tracks the ISS using the NASA open API + Adafruit.io + IFTTT. It keeps time using the RTC. It also has some other codes onboard that I’m developing that will use more of NASA’s API (tracking near earth orbit asteroids, etc.) I had always intended for the piece to make a connection from country to country as well. At the moment, I’m currently on an artist residency in Dresden, Germany. It’s ongoing exploration includes allowing my new friends here in Germany to say “Hello” to the sculpture in Ohio from my phone. Using using the Adafruit.io and my phone, they can trigger a special light show that connects two different cultures located an ocean apart - Adafruit Blog
Issue 21 HackSpace magazine: Air quality monitor
 The new HackSpace Magazine Issue 20 highlights an air quality monitor build using a Raspberry Pi 4 and air quality sensor. The project is programmed in Python 3 with the Adafruit Adafruit IO data service (free at io.adafruit.com) holding data and providing status - Adafruit Blog
Analog Smart Shelf
 Jake P. on HackADay.io is building “A sleek and minimalist wall-mounted shelf with hidden wireless charger and customizable wooden display”. Unlike most smart-assistants, it’s designed to be unobtrusive - HackADay.io
Tweeting with CircuitPython
 This guide shows how to use the Twitter API to get tweets from a specific user (but there’s a lot more you can do with it). As a concrete example, it will be used to regularly fetch the the latest tweet from @codewisdom, a feed that tweets quotes from the software industry. We’ll take those tweets and display them on a PyPortal - Adafruit Learning System
Using WoTT to manage your Adafruit IO feeds!
 Web of Trusted Things (WoTT) published an guide about using Adafruit IO with their WoTT Secure Agent, an open-source solution designed to manage your credentials (such as your static Adafruit IO username/active key pair) - Web of Trusted Things
Working on an IoT Project? Tell us about it!
Are you working on a project which uses Adafruit IO or Adafruit products?? Add the #adafruitio or #adafruitiot hashtags to your tweets, join our Discord channel (http://adafru.it/discord, #help-with-adafruit-io), or join the SHOW-AND-TELL every Wednesday night at 7:30pm ET on Google+ Hangouts.
Around the Internet - IoT News and Shortlinks
Rick Merritt reports LoRa and NB-IoT could claim 86% of all Low-Power-Wide-Area-Networks (LPWAN) by 20203, that’s not too far away!
 The TTGo T-Call is a $15 ESP32 Breakout with an onboard Cellular Modem
 Sonoff Homekit is a bridgeless (no Raspberry Pi required!) HomeKit Setup.
 Hacking a LOHAS LED Smart Bulb
 ludzinc is building an internet-enabled garage door opener.
 View the weather report on a PyPortal and log detailed information about it to an Initial State Dashboard.
 If you’re new (or slightly experienced) with MQTT - Ably.io took a deep-dive into MQTT’s internals.
 FabLabEU built a GPS Mapper to map coverage of The Things Network.
 Isaac Wellish built a an internet-connected PyPortal Trivia Time game.
 Remotely display the status of a ThingsNetwork node over MQTT with this MQTT Remote Display.
 Soothe a six-month old with a remotely-controlled MP3 sound machine.
 Monitor your home’s energy with an ESP32 and (semi-safe) CT-sensors.
 vikkey321 on GitHub built a Not-so-dumb smoke detector with Google Assistant integration
What is Adafruit IO?
Adafruit.io has over 14,000+ active users in the last 30 days and over 750+ Adafruit IO Plus subscribers. Sign up for Adafruit IO (for free!) by clicking this link. Ready to upgrade? Click here to read more about Adafruit IO+, our subscription-based service. We don’t have investors and we’re not going to sell your data. When you sign up for Adafruit IO+, you’re supporting the same Adafruit Industries whose hardware and software you already know and love. You help make sure we’re not going anywhere by letting us know we’re on the right track.
-
Adafruit IOT Monthly: Mid-Century Modern Weather Station, Raspberry Pi 4 and more!
Adafruit IO Update
Adafruit IO’s Zapier Integration in the Zapier App Directory!
 The Adafruit IO Zapier integration is officially listed in the Zapier Application Directory! Have a zap you’d like to connect with Adafruit IO? Head over to the Zapier application directory and search for Adafruit IO! - Read the announcement here!
NEW IoT Hardware: Adafruit AirLift Shield - ESP32 WiFi Co-Processor
 Our new AirLift Shield connects your Arduino-compatible project to the Internet! It’s easy to use the Adafruit AirLift breakout with CircuitPython and the Adafruit CircuitPython ESP32SPI module, or Arduino and the WiFiNINA library. If you have a favorite Arduino or Arduino-compatible like the Metro M4 or Metro 328p - installing this shield is a snap.
Ready to add WiFi to your Arduino project? Head over to the product page for the AirLift Shield.
NEW IoT Hardware: Raspberry Pi 4 Model B - 1GB/2GB/4GB RAM
 The Raspberry Pi 4 Model B is the newest Raspberry Pi computer made, and the Pi Foundation knows you can always make a good thing better! And what could make the Pi 4 better than the 3? How about a faster processor, USB 3.0 ports, and updated Gigabit Ethernet chip with PoE capability? Good guess - that’s exactly what they did! The Raspberry Pi 4 is the latest product in the Raspberry Pi range, boasting an updated 64-bit quad core processor running at 1.5GHz with built-in metal heatsink, USB 3 ports, dual-band 2.4GHz and 5GHz wireless LAN, faster Gigabit Ethernet, and PoE capability via a separate PoE HAT.
IoT Projects
Mid-Century Modern Weather Gauge
 Frustrated that modern indoor weather displays didn’t fit a mid-century aesthetic, Andy Allen retrofit a clock with a custom-face and motorized gauges to display weather pulled from the internet using a Particle Photon. This is an impressive build and an aesthetically pleasing piece of IoT hardware - PowerfulMojo Blog
Using Particle Photon with Adafruit IO
 Maker.IO published a new guide and video for using Adafruit IO with the Particle Photon board. This is a detailed guide and uses the latest Adafruit IO Arduino library for Particle. - DigiKey
Connecting an Arduino Uno WiFi Rev2 to Adafruit IO
 Do you have an Arduino WiFi Rev2? If so, we have good news! The latest Adafruit IO Arduino library is compatible with the Arduino WiFi Rev2. WoolseyWorkshop’s blog posted an in-depth tutorial about connecting this board to the outside world. - WoolseyWorkshop
Smarter Window Fans
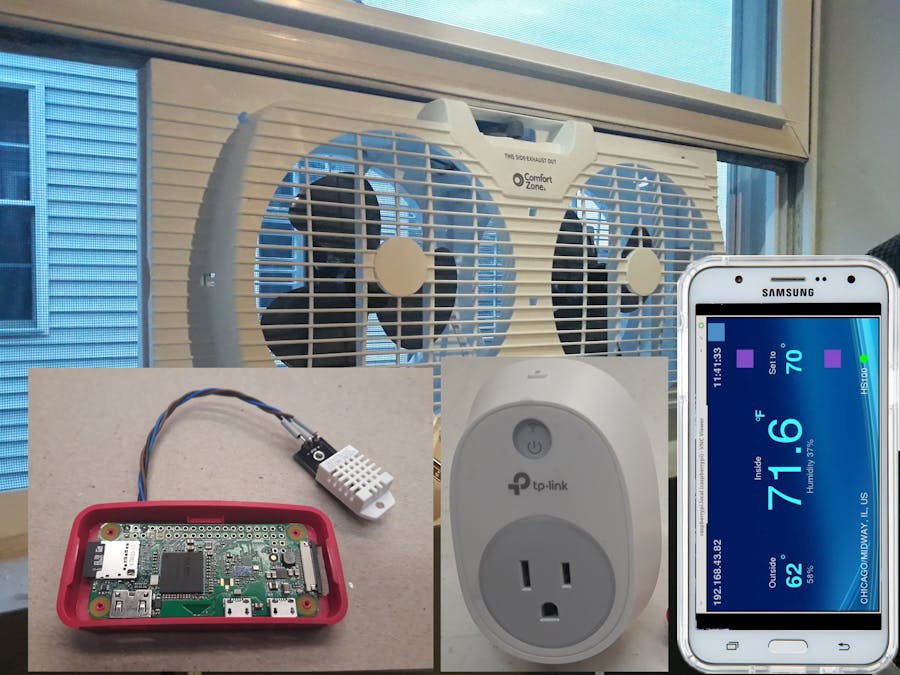 Granpino built a smart-window fan to keep their room cool. It automatically turns on when the outdoor temperature is cooler than the inside temperature. - Hackster.io
ESPBoy brings WiFi to gaming platforms
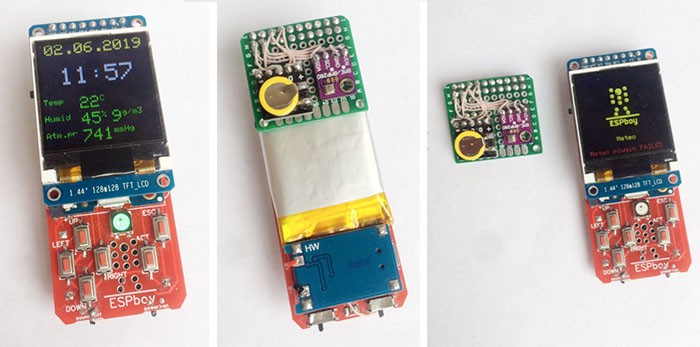 RomanS’ HackADayPrize 2019 entry is the ESPBoy, an open-source ESP8266-based gaming platform with wireless internet. hackaday.io
Working on an Adafruit IO Project? Tell us about it!
Are you working on a project which uses Adafruit IO? Add the #adafruitio hashtag to your tweets, join our Discord channel (http://adafru.it/discord, #help-with-adafruit-io), or join the SHOW-AND-TELL every Wednesday night at 7:30pm ET on Google+ Hangouts.
Around the Internet - IoT News and Shortlinks
@kiwibryn is using a Raspberry Pi LoRa field gateway as a method of interfacing NetDuino and Arduino devices to Adafruit IO. STEM education with IOT! - Twitter
Max Holiday is sending caliper measurements to a spreadsheet with CircuitPython and a SAM32 developer board. - Twitter
@300lines on twitter is enjoying the many MQTT abstractions provided by the Adafruit IO Arduino library - Twitter
Give your Raspberry Pi the gift of sight with TensorFlow 2.0 and computer vision. Low-cost object detection and classification is possible for around $100 Medium
What is Adafruit IO?
Adafruit.io has over 14,000+ active users in the last 30 days and over 750+ Adafruit IO Plus subscribers. Sign up for Adafruit IO (for free!) by clicking this link. Ready to upgrade? Click here to read more about Adafruit IO+, our subscription-based service. We don’t have investors and we’re not going to sell your data. When you sign up for Adafruit IO+, you’re supporting the same Adafruit Industries whose hardware and software you already know and love. You help make sure we’re not going anywhere by letting us know we’re on the right track.
-
Adafruit IOT Monthly: Azure IoT meets CircuitPython, build an internet-connected wearable love pendant, and more!
Adafruit IO Update
Adafruit IO on Awesome Lists
 Adafruit IO has made its way into the Awesome List! Awesome provides lists about all kinds of interesting topics, and Adafruit IO is now a part of to the Awesome master list!
AirLift FeatherWing – ESP32 WiFi Co-Processor
 Our new AirLift FeatherWing connects your Feather-based project to the Internet! It’s easy to use the Adafruit AirLift breakout with CircuitPython and the Adafruit CircuitPython ESP32SPI module, or Arduino and the WiFiNINA library. If you have any feather-compatible board, adding a FeatherWing is a snap! Check out the learning system guide for this board to learn more…
M5Stack Basic Core IoT Development Kit - ESP32 Dev Board
 The M5Stack Basic Development Kit is a ESP32-based WiFi microcontroller that’s compatible with MicroPython and Arduino. It comes jam-packed with WiFi / Bluetooth capability, running at 240 MHz with the dual-core processor and 4MB of SPI Flash. This kit is perfect for people who want to make advanced ESP32 projects with a display, user interface, speaker, and a couple buttons. It’s super easy to snap in other M5 blocks to add sensors, interfaces or cameras, no soldering required. Sounds like the right board for you? Pick one up from Adafruit!
GUIDE UPDATE: Welcome to Adafruit IO
We’ve updated our Welcome to Adafruit IO Guide to include information about Adafruit’s latest WiFi AirLift hardware and details about connecting your CircuitPython project to Adafruit IO. We’ve also added links to our new, hosted Adafruit IO MQTT and REST API documentation pages. Read the guide on the Adafruit Learning System here…
IoT Projects
 Summer is coming, build an AQO (Air Quality Object) to notify you when the air around you is stale. The Air Quality Object changes color depending on air CO2 content. It’s meant to be a beautiful object which also passively displays information about the surroundings. It makes a normally invisible flow visible, so you can open a window when your air is getting stale - GitHub
 In a long-distance relationship? Want to share your feelings with a loved one who is not physically close to you? Techiesms on YouTube has a 2-part video series about building an Internet-connected love pendant. The first part covers their motivation behind the project and the second video explains the technical side of the build - Youtube
 Where is the International Space Station right now? Well, wherever it is, it won’t be there for long. The ISS is always on the move and doing so very quickly. Build an ISS Tracker using a PyPortal to display the current location of the ISS by following this guide - you’ll learn how to parse an API using a PyPortal. Read the learning guide on the Adafruit Learning System here…
 Evaluating IoT cloud platforms can be difficult, and often requires buying separate hardware to connect with each platform. Avilmaru wrote a guide for using the Arduino MKR WiFi 1010 with both the Arduino IOT Cloud and our Adafruit IO service - Arduino Create
 Keep forgetting to water your plants? Want to monitor the ambient temperature of your the room your plant is located in from across the world? In this guide, you will build an Internet-enabled plant monitoring display by combining Microsoft’s Azure IoT Hub and CircuitPython! Using Azure with your CircuitPython IoT projects allows you to rapidly prototype (and even mass-prototype) advanced Internet-of-Things devices and connect them to Microsoft Azure services - Read the guide on the Adafruit Learning System.
Working on an Adafruit IO Project? Tell us about it!
Are you working on a project which uses Adafruit IO? Add the #adafruitio hashtag to your tweets, join our Discord channel (http://adafru.it/discord, #help-with-adafruit-io), or join the SHOW-AND-TELL every Wednesday night at 7:30pm ET on Google+ Hangouts.
Around the Internet - IoT News and Shortlinks
Espressif announced a new ESP32! It’s an ESP32-S2 with USB support and 40 GPIOs along with capacitive touch IOs and peripheral support. It does drop a core, running a Xtensa single-core 32-bit LX7 microcontroller instead of a dual-core LX6 like the ESP32. - Espressif Blog
Improving the safety of the food you eat with IoT - EETimes
Reverse engineering a not-so-secure IoT Device - MCUOneEclipse The IoT cult classic
Little Printer is back with a new app, webhooks, open-source software and more! - nordprojects
Azure IoT CircuitPython module released; do more advanced projects with CircuitPython - GitHub Bill Schweber wonders Whatever Happened to the Hardware On-Off switches? - EETimes
What is Adafruit.IO?
Want to make your project talk to the Internet? Connect your existing project to the Internet to log, stream, and interact with the data it produces? What about all this Internet-of-Things (IoT) stuff?
Adafruit IO is a platform designed (by us!) to display, respond, and interact with your project’s data. We also keep your data private (data feeds are private by default) and secure (we will never sell or give this data away to another company) for you. It’s the internet of things - for everyone! Adafruit.io has over 14,000+ active users in the last 30 days and over 750+ Adafruit IO Plus subscribers. Sign up for Adafruit IO (for free!) by clicking this link.
Ready to upgrade? Click here to read more about Adafruit IO+, our subscription-based service. We don’t have investors and we’re not going to sell your data. When you sign up for Adafruit IO+, you’re supporting the same Adafruit Industries whose hardware and software you already know and love. You help make sure we’re not going anywhere by letting us know we’re on the right track.
