-
Adafruit IO on Awesome Lists, a curated list of awesome Adafruit IO guides, hardware, guides, videos, libraries, frameworks, and resources. #AdafruitIO #Awesome @AdafruitIO
 The newest list in Awesome List is the Adafruit IO Awesome List! Awesome provides lists about all kinds of interesting topics, and Adafruit IO is now a part of to the Awesome master list!
  What is the Adafruit IO Awesome list?
A curated list of awesome Adafruit IO guides, hardware, guides, videos, libraries, frameworks, and resources.
You can find the Adafruit IO Awesome List here on the Adafruit GitHub repository here.
-
Adafruit IOT Monthly - May 2019
AIO Update: Features, Stats, and More!

IO Stats
Adafruit.io has over 15,000+ active users in the last 30 days and over 700+ Adafruit IO Plus subscribers. Sign up for Adafruit IO (for free!) by clicking this link.
Ready to upgrade? Click here to read more about Adafruit IO+, our subscription-based service. We don’t have investors and we’re not going to sell your data. When you sign up for Adafruit IO+, you’re supporting the same Adafruit Industries whose hardware and software you already know and love. You help make sure we’re not going anywhere by letting us know we’re on the right track.
Adafruit IO on Reddit
Adafruit IO now has a dedicated subreddit! Subscribe over at /r/AdafruitIO to add the latest Adafruit IO news to your Reddit Front Page.
Awesome Adafruit IO
Awesome Adafruit IO is a curated list of awesome Adafruit IO guides, videos, libraries, frameworks, software and resources. Inspired by the Awesome lists. It will be updated by the team & community - we’re looking for contributors!
Stop by and check it out awesome-circuitpython and keep reading!
Adafruit IO Plus Plan Upgrades Are Here!
One of the most consistent requests we’ve had since we launched IO Plus (IO+) was for a way to raise the IO+ account limits even further.
Library Update: Adafruit IO Arduino
If you have a shiny new piece of Adafruit WiFi AirLift hardware and want to use it with Arduino - you’re in luck! The Adafruit IO Arduino library has been updated to v3.1.0, including an update for using AirLift boards (such as the PyPortal or Metro M4 WiFi Lite) or breakouts.
Grab the new release from the Arduino Library Manager or download it from the Adafruit GitHub.
New IOT Hardware from Adafruit
Adafruit’s new WiFi boards have arrived. Both of these boards come with AirLift - our witty name for the ESP32 co-processor - and are compatible with both Arduino and CircuitPython. All AirLift boards can also connect to Adafruit IO.
Adafruit AirLift – ESP32 WiFi Co-Processor Breakout Board

Give your plain ol’ microcontroller project a lift with the Adafruit AirLift - a breakout board that lets you use the powerful ESP32 as a WiFi co-processor. You probably have your favorite microcontroller (like the ATmega328 or ATSAMD51), awesome peripherals and lots of libraries. But it doesn’t have WiFi built in! So lets give that chip a best friend, the ESP32. This chip can handle all the heavy lifting of connecting to a WiFi network and transferring data from a site, even if it’s using the latest TLS/SSL encryption (it has the needed root certificates pre-burned in). This breakout includes a crypto chip, too!
Want to pick one up? Visit the Adafruit Store!
Adafruit Metro M4 Express AirLift (WiFi) - Lite

Give your next project a lift with AirLift - our witty name for the ESP32 co-processor that graces this Metro M4. You already know about the Adafruit Metro M4 featuring the Microchip ATSAMD51, with it’s 120MHz Cortex M4 with floating point support. With a train-load of FLASH and RAM, your code will be fast and roomy. And what better way to improve it than to add wireless? Now cooked in directly on board, you get a certified WiFi module that can handle all your TLS and socket needs, it even has root certificates pre-loaded. Since this is a lite version of the AirLift module, it has a 8MB flash and no crpyto chip.
Want to pick one up? Visit the Adafruit Store!
Powered by Adafruit IO: Projects from the Community
Low Cost Internet Enabled Voltage and Current Logger

Smart HDMI Switcher with Adafruit IO and IFTT

Adafruit IO Raspberry Pi Cloud Camera Tutorial

Mini IOT Display with PushBullet Notifications

Working on an Adafruit IO Project? Tell us about it!
Are you working on a project which uses Adafruit IO? Add the #adafruitio hashtag to your tweets, join our Discord channel (http://adafru.it/discord, #help-with-adafruit-io), or join the SHOW-AND-TELL every Wednesday night at 7:30pm ET on Google+ Hangouts.
New Adafruit Learning System Guides
Have you heard about making, cosplay and electronics, but don’t know where to start? Visit the Adafruit Learning System for over 1700 tutorials for electronics projects, ideas and techniques! We’ve selected a few of our favorite internet-of-things-based guides from the learning system:
ePaper FeatherWing Quote Display

Build this quote display using the Adafruit HUZZAH32 (ESP32) Feather and ePaper FeatherWing. Add a LiPo battery and you have a portable quote display.
Data Logging IOT Weight Scale

How many grams of coffee did I add to my pour-over? Is the bag of cat food empty? Did I remember to water the plant? What’s the weight of these screws in my workshop? To answer these questions (and more), you’re going to build an internet-enabled scale to track weight data over a period of time.
PyPortal Tides Viewer

Surfs up! Or is it? This guide will show how you can use an Adafruit PyPortal smart display to easily fetch tide information from the Internet and display it.
PyPortal Philips Hue Controller

In this Learn Guide, you’ll be building a touchscreen lighting controller with an Adafruit PyPortal to control a light, or groups of lights, connected to a Philips Hue bridge.
PyPortal Weather Station

Harness the power of nature with your PyPortal by building an internet-connected Weather Station!
Adafruit IO Basics: AirLift

If you want to the best way of bringing your project online - combine Adafruit IO and AirLift! Our ESP32-based AirLift boards and breakouts are the newest way to connect your project to Adafruit IO, our internet-of-things service for everyone!
Multi-Sensor IoT Environmental Sensor Box With CircuitPython

This guide will walk you through making an environmental monitoring device with GPS, Temperature, Humidity, Barometric Pressure, and Air Quality sensors, all updating to the cloud. Once build, this project takes readings occasionally and sends them to Adafruit IO, stamped with time and location. All that is required is an AC outlet and a WiFi network.
Around the Internet
- Top LoRA add-on boards and SBCs (our RFM9x LoRa Bonnet is included!)
- TinyML - IOT Machine Learning for Microprocessors
- When you move: what to do with your smart devices
- Building an army of ESP32 Air Quality Sensors
- Brooklyn 5G Summit Wrap-up - Industries, Standards, and Machine Learning
- “What wireless standard should be used with my project?” - a comprehensive overview of selecting an IOT standard for your project, factoring in selection criteria such as range, content, data range, and translation of 3 dimensional space to radio space.
- Particle IOT @ Adafruit, a video Interview with Zach Supalla & Ladyada
- Brewing Eisbock Beer with Raspberry Pi and Windows IOT
- ESP RFID - An Open Source Access Control system framework using a cheap MFRC522, PN532 RFID, RDM6300 readers or Wiegand RFID readers and Espressif’s ESP8266 Microcontroller. Perfect if you’re managing a lab or maker space.
- FindyBot3000: An organizer for all your tiny electronics parts and boards with voice control.
- IOT Remote Light Switch
- Build Plant Observatory Using Azure IOT and Node.js
-
Adafruit IO Plus Plan Upgrades Are Here!
One of the most consistent requests we’ve had since we launched IO Plus (IO+) was for a way to raise the IO+ account limits even further. We’re happy to announce that with an Adafruit IO+ subscription, you can now add data rate and storage time limit upgrades!
The single biggest thing we do to make sure that Adafruit IO is available for as many people as possible 24 hours a day, 365 days a year is rate limiting the messages that pass through the system. For IO Free accounts, the rate limit is 30 messages per minute, or about 1 every 2 seconds. For IO+, we double the available data rate to 60 messages per minute, or about 1 per second. That’s double the data rate for everyone using IO+, but still a hard cap on usage.
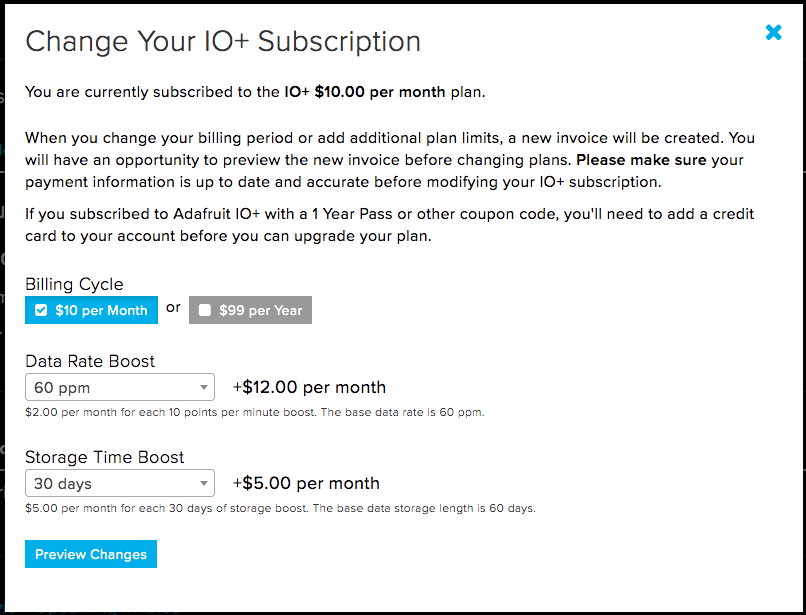
The new IO+ subscription upgrades are:
- Data Rate can be boosted in 10 points per minute increments for $2 per month or $24 per year.
- Data Storage can be boosted in 30 day increments for $5 per month or $60 per year.
So if you want to double your data rate again from 60 to 120, that would be 6x Data Rate Boost @ $12 per month or $144 per year. If you wanted to double your data storage length from 60 days to 120 days that would be 2x Data Storage Boost @ $10 per month or $120 per year.
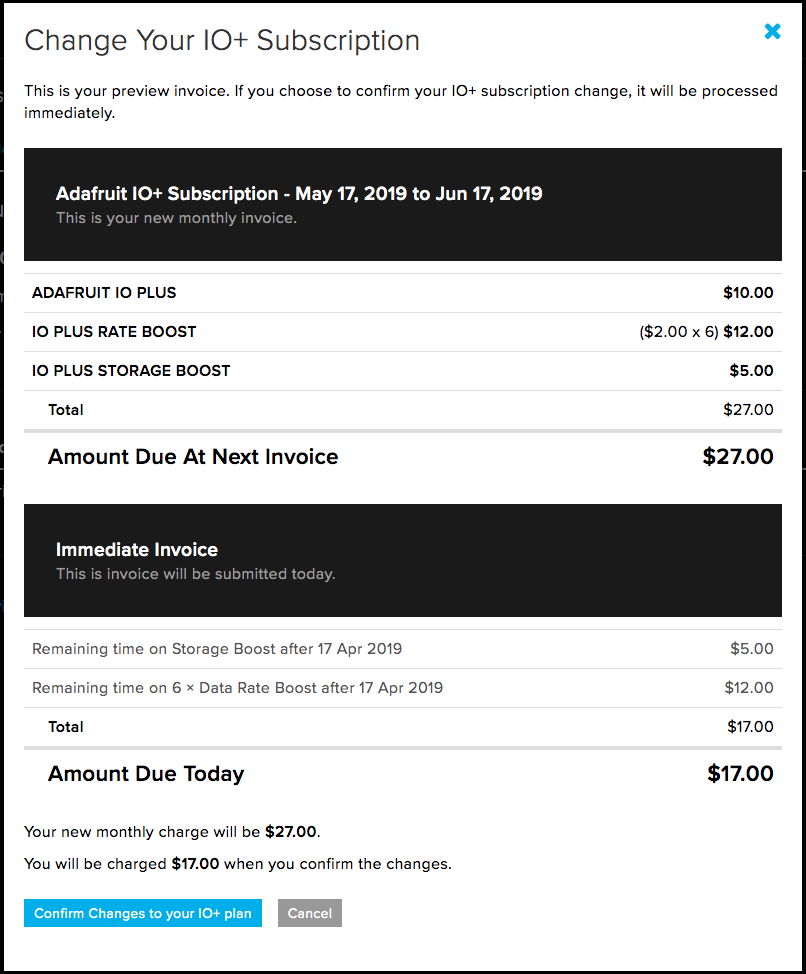
You can upgrade or cancel upgrades at any point during your subscription billing cycle, but you will have to pay the full amount for the remaining time on your billing cycle when you activate an upgrade. For example, if you’re subscribed on the IO+ monthly plan and add a 10x Data Rate Boost ($20 per month) halfway through your billing cycle, you’ll be charged about $10 for the time remaining in the current cycle and $30 ($10 for IO+ plus $20 for 10x Data Rate Boost) on your next monthly bill.
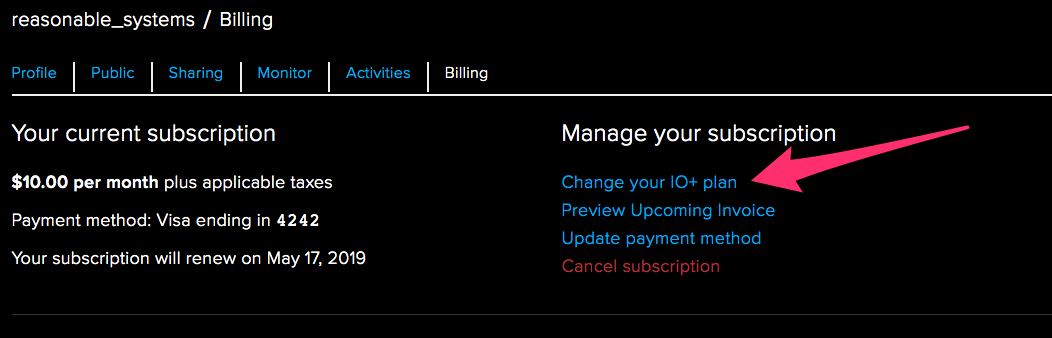
You can start the process by clicking “Change your IO+ plan” on your account billing page.

The prorated amounts are calculated when you add a subscription upgrade and you’ll have a chance to preview your new monthly bill before activating it.
This is our first experiment with a new kind of subscription upgrade for IO+, please stop by the forums or our channel on the Adafruit Discord server and reach out if you have any questions!
-
Adafruit IoT Monthly - April 2019
Welcome to the Adafruit IoT Monthly for the month of April. This newsletter (in blog form) highlights projects and updates about Adafruit IO – our Internet-of-Things Service for makers, news, stories, and advances in the world of IoT.
Adafruit IO News: Features, Stats, and Updates
IO News highlights what’s new on Adafruit IO, our internet-of-things service for makers.IO Stats
Adafruit.io has over 15,760+ active users in the last 30 days and over 500+ Adafruit IO Plus subscribers. Sign up for Adafruit IO (for free!) by clicking this link. Ready to upgrade? Click here to read more about Adafruit IO+, our subscription-based service. We don’t have investors and we’re not going to sell your data. When you sign up for Adafruit IO+ you’re supporting the same Adafruit Industries whose hardware and software you already know and love. You help make sure we’re not going anywhere by letting us know we’re on the right track.
Sneak Peek: New Adafruit IO API Docs!
https://www.youtube.com/watch?v=DZOPQXRH9RI&feature=youtu.be
While our current API documentation works, we’ve been brainstorming ideas to make it better and easier-to-use. Here’s a small list of the features we’re planning on adding: * Easy to Contribute to: While our pre-existing API is public on GitHub, it is not the easiest to contribute to (the v2 HTTP API sits at just over 4000 lines of JSON). The new documentation will be easier to contribute to - it’s all in everyone’s favorite formatting syntax - Markdown! * You can access Adafruit IO’s API over either MQTT or HTTP - we’re adding dedicated documentation pages for both the MQTT and the HTTP APIs. * Writing some code and not sure how to get the last known data value of your feed? Don’t want to read through lines of example code - just need the code? We’ll be including code-snippets for CuRL, Arduino CPP, Python, CircuitPython, and Ruby.
Adafruit IO’s Zapier Integration is now in Early Access!

The Adafruit IO Zapier integration is now a public Zapier integration (currently in early-access)! While we’ve made a lot of Adafruit IO projects which use Zapier, people would need to enter a special “invite” URL as we did not have enough people actively using the service and Adafruit IO together. As of today, the “invite” URL is replaced by an official Zapier integrations URL and landing page - https://zapier.com/apps/adafruit-io/integrations.
All The Internet of Things Episode 4, Adafruit IO
https://www.youtube.com/watch?v=yRqazWCtSgI Want to learn more about Adafruit IO? We’ve released an episode of All The Internet of Things episode featuring Adafruit IO.
Hello, and welcome to episode 4 of Adafruit and Digi-Key’s “All the Internet of Things”! A six-part series that covers everything you need to know about IoT. In the previous episode, we discussed services –services are what you use to route events to and from your IoT devices, coordinate real-time communication between multiple devices, and record, process and visualize the data that your “things” are producing. We also talked about some large cloud services such as Amazon AWS IoT, Google Cloud IoT, and Microsoft Azure IoT Suite. You might find that although these services provide robust security and sophisticated deployment tools, getting started with using their comprehensive technology is intimidating. If only there were some IoT service that proved easy to understand and implement…maybe with high quality documentation with examples, learning guides, and community support…and, maybe just maybe, an IoT service that provided opens source solutions with a low to no-cost point of entry… Well, on today’s episode, we’re happy to do a formal introduction to just that – our very own Adafruit IO!
We have an interactive learn guide here with accompanying clips and text from the video!
Powered by Adafruit IO: Projects from the Community
Each month, we select our favorite projects from around the internet which use Adafruit IO. Here are some of our favorites:
Monitor Your Garage Door with #FeatherHuzzah #AdafruitIO and a Pi Zero W

There are lots of garage door monitor projects on hackster.io and other Maker sites. Many are single-purpose solutions. I wanted a project that would be extensible, to build on the skills learned for future IOT projects. In fact, I already had a project in mind, a general notification platform called the Kinetic Courier. That project could include a garage door monitor as an example notification trigger. Also, I wanted a platform that was well-documented and well-supported. Adafruit’s cloud service for Makers, adafruit.io, fit the requirements. In addition, I was motivated by personal need. My nice neighbors had, once too often, called late at night to remind me the garage door was open 😉
IOT Office Door Sign using PyPortal
Blood Glucose on a PyPortal
Google Assistant Based Home Appliance Control using ESP32 and Adafruit IO

If you have a home appliance which you want control over the internet and don’t want to shell out the cost of a smart-plug – this tutorial may be the right choice. Using an ESP32 module, a relay module and Adafruit IO – you can control any AC home appliance over the internet. This tutorial walks you through the process of wiring the ESP32, setting up Adafruit IO, and creating a dashboard. But, instead of flipping a digital switch – what about controlling the lights using your voice? The guide also walks through the process of connecting to Google Assistant using IFTTT (a supported Adafruit IO Integration) and sending voice commands to the light switch.
Adafruit IO-Powered PowerPoint Slide Controller

James Bulpin “was looking for a really simple solution to bounce messages via the cloud without all the complexity of a full IoT hub solution” and discovered Adafruit IO. He quickly built a mobile PowerPoint slide controller. If you’re not counting his phone’s web browser displaying an Adafruit IO dashboard, it uses no extra electronics. Instead, he’s running a .NET MQTT client on the same computer to send events to Microsoft Powerpoint. To send data to his computer, he built a drag-and-drop dashboard on Adafruit IO to interact with MQTT feeds.
Meeting forecast? Glance at this CircuitPython-Powered PyPortal!

Ronhiltz got his PyPortal up and running – but what to display on the 3.2″ 320 x 240 color TFT internet-connected display? Ron converted a picture of his office into a BMP, created a feed on Adafruit IO, and is using a PyPortal to show how their office is meeting forecast. Great work! With the PyPortal and the CircuitPython Adafruit IO library – it’s never been easier or quicker to create an Internet-connected project!
Sending Data to the Cloud – ESP8266 Arduino Tutorial, Part 3

Alexander has been writing a large ESP8266 tutorial series on HackADay.io about the versatile ESP8266. In the third installation of his guide, he walks through the process of sending data from sensors connected to an ESP to an REST API – Adafruit IO.
Read more… Are you working on a project which uses Adafruit IO and want to show it off? Add the #adafruitio hashtag to your tweets, join our Discord channel (http://adafru.it/discord, #help-with-adafruit-io), or join the SHOW-AND-TELL every Wednesday night at 7:30pm ET on Google+ Hangouts.
New Adafruit Learning System Guides
Have you heard about making, cosplay and electronics, but don’t know where to start? Visit the Adafruit Learning System for over 1500 tutorials for electronics projects, ideas and techniques! We’ve selected a few of our favorite internet-of-things-based guides from the learning system:
IoT Motion and Temperature Logger with the Analog Devices ADXL343 + ADT7410 Sensor FeatherWing and Adafruit IO

If you’re looking to for a way to monitor and send precise motion and temperature data to the cloud, check out this new guide. Analog Devices, known for their reliable and well-documented sensor chips – has a high precision and high resolution temperature sensor – the ADT710 – and a triple-axis accelerometer – the ADT7410. We made a FeatherWing to make these sensors easier to use together. Even better? We can easily bring the FeatherWing online using a Feather ESP8266 HUZZAH and Adafruit IO.
PyPortal Email Display with Zapier and Adafruit IO

Want to write a message to your PyPortal’s display? Perhaps you’d like to easily add and change text on your PyPortal’s display to use it as a smart sticky-note, or have people email it directly! Using Zapier, you will set up a Zap to receive email via a custom Zapier email address at zapiermail.com and forward it to an Adafruit IO Feed. With some CircuitPython Code, your PyPortal will be obtaining the current value of an Adafruit IO Feed and updating the display with the email sender address and the subject line.
NEW GUIDE: PyPortal Bitcoin Display

Keep up to date on the current value of Bitcoin or your total wallet value with the PyPortal Bitcoin Display! The simple version of this project will display the current value of Bitcoin in one of three currencies — USD, Euros, or GBP. The slightly more complex version uses a text transform to present the total value of your Bitcoin wallet based upon the current Bitcoin value and number of coins owned. All made in CircuitPython running on the PyPortal accessing the Coindesk API wirelessly!
Read more… Join us in the forum or on Discord in the help-with-adafruit-io channel with questions, comments, or suggestions. We’d love to hear from you!
-
Adafruit IO Sneak Peek: New Adafruit IO API Docs! #API #HTTP #MQTT @adafruitio
[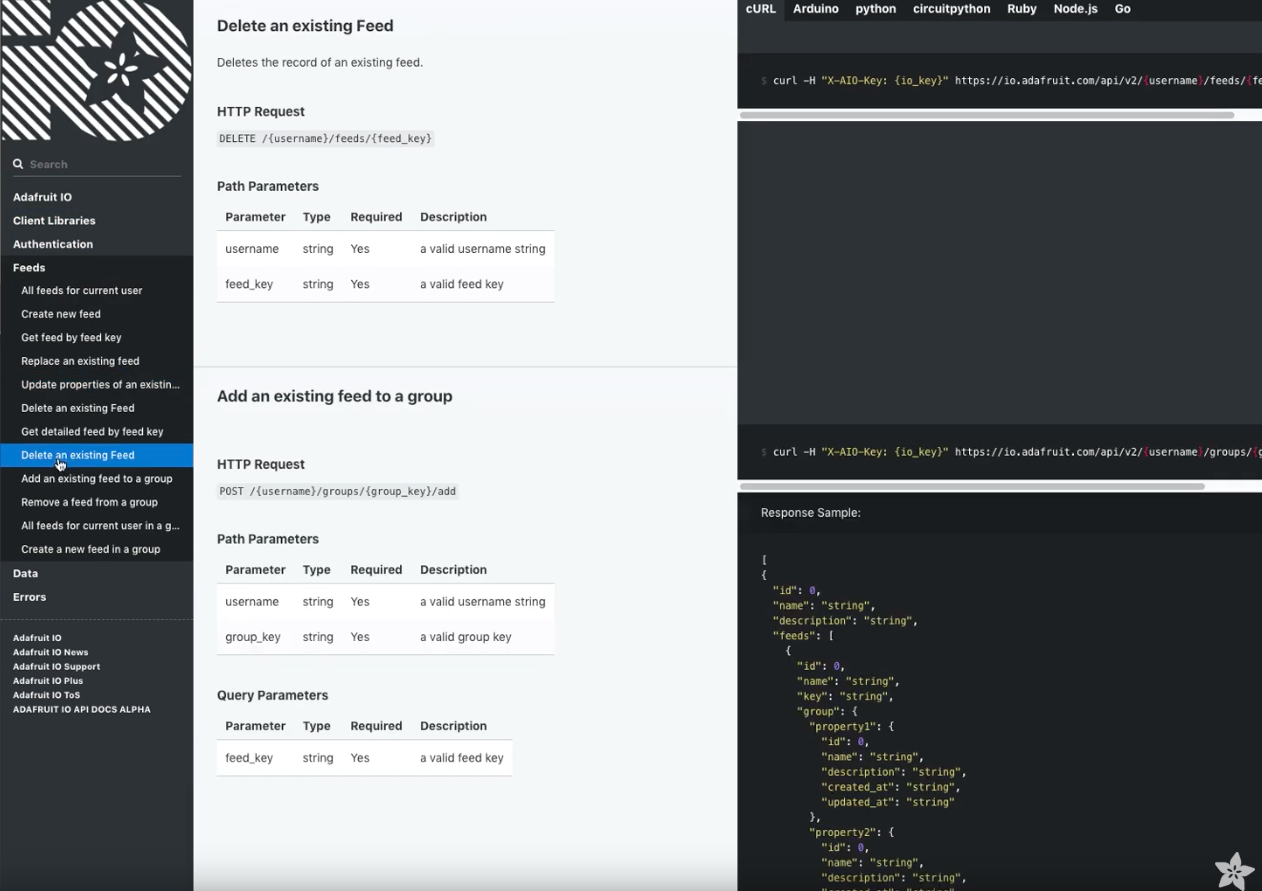](https://www.youtube.com/watch?v=DZOPQXRH9RI&feature=youtu.be)The Adafruit IO team is in the middle of building out a shiny new API documentation website. While updating a website for documentation doesn’t sound exciting - we have a feeling you’ll like what’s coming soon. While our current API documentation is functional, we’ve been brainstorming ideas to make it better and easier-to-use.
Here’s a small list of the features we’re planning on adding: * Easy to Contribute to: While our pre-existing API is public on GitHub, it is not the easiest to contribute to (the v2 HTTP API sits at just over 4000 lines of JSON). The new documentation will be easier to contribute to - it’s all in everyone’s favorite formatting syntax - Markdown! * You can access Adafruit IO’s API over either MQTT or HTTP - we’re adding dedicated documentation pages for both the MQTT and the HTTP APIs. * Writing some code and not sure how to get the last known data value of your feed? Don’t want to read through lines of example code - just need the code? We’ll be including code-snippets for CuRL, Arduino CPP, Python, CircuitPython, and Ruby.
Are you excited for the next version of the Adafruit IO API Documentation? Have features or suggestions to propose? Post up on the forum topic for this here or leave a comment below!
Join us in the forum or on Discord in the adafruit-io channel with questions, comments, or suggestions. We’d love to hear from you!

